Pages

Monday, October 31, 2011

Eggless Chocolate Cake and Happy Halloween !!

This is my son's first Halloween here and he is all excited today. His favourite cartoon is Caillou, so he wants to do everything what Caillou does. My son has picked up lots of things about Halloween from this cartoon, maybe now he knows more than us ;). We were amazed when our 2 year old son picked up a small pumpkin from grocery store during shopping and he said "lets make eyes, nose and mouth for it just like how Caillou did ". Then my hubby decided we should carve a pumpkin this time. My little one was all excited when his father did the carving and he himself chose the pattern for the pumpkin.

Today's recipe is Eggless Chocolate cake. I tried a chocolate cake few days back, which was my own recipe, but the outcome wasn't really good. So this time I wanted to try out a perfect eggless chocolate cake, hence I followed the exact recipe from Rak's Kitchen. The cake turned out great, so soft and moist. The best part was that its no eggs, no butter cake. I must say it turned out a perfect one and was so simple to make. My son didn't allow me to take better clicks as he was switching off the lights to see the lighted pumpkin in the dark :)

View the original recipe here at Rak's Kitchen.


What you need?

1.5 cups All Purpose flour 
3 tbsp Cocoa powder
1 tsp Baking soda
A pinch Salt

1 cup Sugar
1/4 cup Oil
1 cup Water
1 tbsp Lemon Juice or Vinegar
1/2 tbsp Vanilla essence

2 tbsp sliced Almonds (optional)


How to prepare?

Combine flour, cocoa powder and baking soda well. Sieve this for even mixing and keep aside. Dissolve sugar in water, add salt, oil, lemon juice and vanilla essence to this . Mix well. Add the flour to the wet mixture and whisk well to get a smooth watery batter.

Preheat the oven to 350F. Grease a pan with oil, dust it slightly with flour. Pour the batter to the pan. Throw some almonds on the top.

Bake it for 35-40 minutes. Insert a toothpick or knife to see if it comes out clean. Cool it for 10-15 minutes and then invert the cake. Once cooled completely, cut into pieces.

Enjoy the delicious, moist and soft chocolate cake !!


Friday, October 28, 2011

Coconut Laddu

Hope all of you had a wonderful Diwali. I too had a great time with my family and close friends. Today's recipe is another sweet, Coconut Laddu. I made these on the Diwali eve and distributed these laddus to our friends. This was the first time I tried out these laddus and they came out awesome. My hubby is a sweet lover and he was really impressed. My friends also appreciated and they said the laddus tasted just like the store bought ones. I was so flattered and on top of the world. I come from the Land of Coconuts - Kerala...and I was wondering why I never tried these yummy laddus before :)


What you need?

2.5 cups shredded Coconut (fresh or frozen)
1 cup Milk
1.5 cups Sugar
1 tbsp broken Cashews
2 tsp Ghee
1/2 tsp Cardamom powder
1/4 cup sweetened Coconut (optional)


How to prepare?

Heat ghee in a pan. Fry the cashews till golden brown and keep aside.

In the same ghee, saute the grated coconut for 3-4 minutes or until the raw smell goes. Now add milk and allow it to boil. Stir continously and cook until the milk is all absorbed . Add the sugar and cook by stirring continuously until you get a thick mixture. Now add cardamom powder and mix well. When the mixture starts leaving out the pan, its done.

Remove from heat and keep the mixture aside. Roll them into laddus while they are warm. Now roll over these laddus on the top of sweetened or regular coconut for extra taste. Place one cashew on top of each laddu. The laddus are now ready, serve when they are cooled completely. Refrigerate them for storage.


Makes about 20 laddus.

Notes:
* Use condensed milk instead of milk and sugar for making quick laddus. Add approx. about 1 3/4 to 2 cups of sweetened condensed milk.
* If you feel the mixture is very sticky while rolling, grease your hands with a little ghee and then roll into laddus.
* You can avoid frying the cashews in ghee, instead place whole plain cashew on top of each laddu.
* You can also garnish with other nuts or raisins.


Monday, October 24, 2011

Carrot Halwa and a Happy Diwali !!

Diwali is almost here....Wishing all my readers and friends a very Happy Diwali in advance. Diwali is the festival of lights celebrated all over India. It's one of the most important festival in our land. Diwali brings so many good memories to me...especially the fireworks, sweets, family get-togethers and lots of fun. We always celebrate Diwali back in India. So here in US, the best thing we would miss is the fireworks, especially my son !! 

Diwali is the festival of sweets as well I guess. We usually give sweet boxes to family and friends. So today I am here with the recipe of a very popular sweet, Carrot Halwa. It's my husband's favourite and a great sweet for the festive time. There are many easy methods for preparing this halwa using pressure cooker or microwave. But I preferred the traditional method making in kadai. Though its time consuming, its worth the effort :).  This halwa just tastes excellent and delicious.


What you need?

2.5 cups grated Carrots
1 cup Milk
3/4 -1 cup Sugar
1-2 tbsp Ghee
2 tbsp broken Cashews
A pinch Cardamom powder


How to prepare?

Heat ghee in a heavy bottomed pan. Fry cashews till golden brown and keep aside.

In the same ghee, add carrots and saute for 3-4 minutes until the raw smell goes. Now add the milk, let it boil. On a medium flame, cook the carrots in the milk until the milk gets dried up. Remember to keep on stirring all the time so that it won't get burnt.

Now add the sugar, cook the carrots in the sugar syrup. Keep stirring until you get a thick mixture. Once thick, add cashews, cardamom powder and more ghee if you desire. Keep on mixing until the halwa starts leaving the pan.

Enjoy this wonderful sweet on the occasion of Diwali.


Notes:
* Increase ghee and sugar as per your taste.
* It's best to use a heavy bottomed non stick pan.
* You can use other nuts as well.


Wishing again you and your family a very Happy and Safe Diwali !!


Friday, October 21, 2011

Oats Puttu/Steamed Oats and CheruPayar Curry/Green gram curry

Puttu is a popular breakfast in Kerala usually made of rice flour and coconut. I always wanted to try puttu with oats and finally I prepared it yesterday. As you all know, Oats is a healthy food and it should be made as a part of our daily diet. It has the most soluble fibre and helps to reduce blood sugar, cholestrol levels etc. Oats porridge is the most common dish with oats, but there are enormous options ranging from upma or dosa to breads and muffins. 

I don't have a puttu maker here. I make the puttu in idly cooker/steamer and hence I don't get the cylindrical traditional puttu. The taste matters rather than the shape rt :). Usually puttu is served with Chickpeas/Kadala curry or Cherupayar/Green gram curry. Both are awesome combinations and I love them equally. Oats puttu came out good and I made the Green gram curry to serve along with it. I felt that making oats puttu is not as easy as dealing with rice flour and it sticks slightly as well. But finally the puttu tasted great and its sure a healthy dish !!

Check out other Oats recipes here.


What you need?

For Oats Puttu/Steamed Oats:

1.5 cups Oats
1/2 cup grated Coconut
Salt
Water

For Cherupayar/Green gram curry:

1 cup cooked Green gram
1/2 tsp Mustard seeds
1/2 tsp Cumin seeds
3-4 Green chillies slit
5-6 Curry Leaves
1/4 cup grated Coconut
1 tsp Oil
Salt


How to prepare?

Oats Puttu/Steamed Oats:

Dry roast the oats in a pan for 3-4 minutes until it emits aroma. Keep aside and cool. Grind the oats in a blender to a fine powder. Add salt and coconut to the powdered oats, mix well. Sprinkle warm water a little at a time to make the oats moist. It may not be as easy as you do the rice flour and it might be a little sticky too. Oats shouldn't be very dry or too wet and there shouldn't be lumps.

You can use a puttu maker for steaming. Else in a steamer/idly cooker, put a clean cloth on the steamer separator vessel. Put the oats on the cloth. Steam for 8-10 minutes. Serve hot with Cherupayar curry and papad.


Cherupayar/Green Gram curry:

Heat oil in a pan. Splutter mustard and cumin seeds. Add green chillies and curry leaves, saute for few seconds. Now add the cooked green gram and salt, mix well. Add coconut to this and combine everything well. Finally add some water so as to get a medium consistency curry, not too thick or too thin. Bring it to a boil and mix well. The curry is now ready to be served with puttu.


Enjoy a healthy  and delicious breakfast !!


Have a great weekend folks...Cya soon with another recipe !!

Sending this to Kerala kitchen event at A Girl's Diary hosted by Khushi , initiated by Ria


Wednesday, October 19, 2011

Baked Bread Bites

Yesterday was a cold day and I was wondering what to prepare as snack to cope up with the chill weather. I had one packet of bread untouched for few days and thought of trying something new and simple with them. I made a filling with paneer and spinach which is our favourite and a classic combo. I use this combo to prepare Paneer Spinach Corn sandwich as well as in Paneer Spinach bonda. I baked them rather than frying which didn't take much time too. I was confused what to name these and finally decided on Baked Bread Bites. The bread was a little crunchy, filling was great and these hot bites were sure perfect for a cold evening. My hubby too enjoyed these a lot and was curious how I made the breads into these shapes :)


What you need?

8 Bread slices
1 cup grated Paneer
1/2 cup chopped Spinach
1 Onion chopped
1/2 tsp Cumin seeds
1 tsp Chilli powder
1/2 tsp Coriander powder
1/2 tsp Garam masala
1/4 tsp Chaat masala
1 tsp Oil
Salt


How to prepare?

Heat oil in a pan. Splutter cumin seeds. Saute onions until they become translucent. Add spinach and saute until spinach is cooked. Now add all the spices - chilli powder, coriander powder, garam masala, chaat masala and the salt. Finally add paneer and combine everything well. Keep this filling aside to cool.

Take each bread slice. With a container lid, press on the bread surface so as to get a circular shape. Try using a lid with which you can make biggest circle out of the bread so that just the sides are wasted. Now using a rolling pin, gently roll on the bread to flatten it. Apply a little water along the circumference for sealing purpose. Keep the filling inside and fold the bread, seal the edge.

Preheat oven to 400F. Line a baking tray with aluminium foil and lightly grease it. Transfer the breads to the tray and slightly brush some oil on them as well. Bake for about 12-15 minutes until they become slight brown. Serve hot with tomato sauce.

Serves 2-3

Notes:
* Gently handle the bread so that it won't tear off.
* It's better to use large sandwich breads.
* You can fold into any shapes you desire.
* You can deep fry or shallow fry also.


Monday, October 17, 2011

Beetroot Raita

Nature has provided us with so many colourful vegetables and fruits. I love the colour of the beets and when mixed with yoghurt it gives a lovely and pleasing colour. This recipe is different from the usual Beetroot pachadi prepared in south India, where coconut is used. This raita is a simple one where beetroot is cooked and added to yoghurt. I am fond of raitas, so the colour and taste of this one is very comforting to me. Beetroot is very nutritious too, they also help to cleanse our system and purifies blood as well. So its always best to include this wonderful veggie in our diet.


What you need?

1 Beetroot
1 cup Yoghurt
1/2 tsp Mustard seeds
2-3 Green chillies slit
5-6 Curry Leaves
1 tsp Oil
Salt

How to prepare?

Peel and grate the beetroot. Heat oil in a pan. Splutter mustard seeds. Saute curry leaves and green chillies for a minute. Add beetroot to this. Sprinkle some water and a little salt, mix well. Cover and cook until beetroot is soft. Once done, keep aside this to cool.

Combine beetroot and yoghurt now. Adjust salt if required. Serve with rice or roti.


Friday, October 14, 2011

Cake Pudding

I always wanted to make some pudding with cake. I had some Eggless Sponge Cake which was my last post and thought of making some pudding with it. Trifle was the best option where usually sponge cake, custard, jelly etc are used. But I didn't have any custard powder or jelly and not even any ice cream.

I started to think how to make the pudding with the things available at home. Then I came up with this recipe which is so simple and can be made very quick. I just combined some whipped cream and chocolate syrup to get a chocolaty cream, used some cake, added some fruits and nuts as well. Each layer was colourful and great.

This is something which is like a quick fix for a dessert. Be creative and make layers as you wish. When served chilled it makes an excellent dessert.


What you need?

(These are approximate measurements. Feel free to increase or decrease.)

1.5 cup Cake chopped into small cubes
1 cup Whipped cream
3-4 tbsp Chocolate Syrup
1 Apple
8-10 Dates
1/2 cup Tutti Fruity
2-3 tbsp Honey
2-3 tbsp Almonds sliced


How to prepare?

Chop the apple and dates into small pieces. Mix them with honey.

Thaw the whipped cream for few minutes. Whisk whipped cream and chocolate syrup to get a smooth chocolate cream.

In a tall glass, put some cake pieces as the bottom layer. Then add the chocolate cream on top of it. Add the fruits now. Add the chocolate cream again. Now put the tutti fruity and some almonds. 

Repeat the layers until you reach the top of the glass. The top layer should be tutti fruity and nuts so that it will be colourful. Top it with some fresh whipped cream and a cherry. 

Serve it chilled.

Serves 2

Notes:
* Make layers as you desire.
* Use any fruits and nuts of your choice.


Have a wonderful weekend friends...Cya soon with another recipe...:)


Wednesday, October 12, 2011

Eggless Sponge Cake

Today I would like to share something very cute and funny about my son. He is 2 years old and a very naughty guy. He likes to imitate others especially his parents. He always observes and of-course disturbs me while I click pictures of food for my blog. Now he has started aping me by taking his toy camera and clicking snaps. Then he would take his toy laptop, press the blog button in it and he would shake his camera on the top of laptop. Then he would say he is putting the pictures in his blog :). We can't just stop laughing at his cute actions !!

Now coming to recipe...this is one of Nita Mehta's cookbook recipe which I had jotted down in my book. It's a basic sponge cake which is eggless version. The cake is so soft, moist and delicious. This is one cake recipe I guess you can never go wrong and it's so simple. You should try this and I am sure you will make this often.


What you need?

1.5 cups All Purpose flour
1 cup thick Yoghurt
3/4 - 1 cup Sugar
1/2 tsp Baking soda
1 1/4 tsp Baking powder
1/2 cup Oil
1.5 tsp Vanilla essence
1/4 - 1/2 cup Tutti Fruity mix (optional)
1 tbsp Milk  (for brushing the top)

How to prepare?

Sieve flour and keep aside. Mix yoghurt and sugar until sugar gets dissolved completely. Add baking powder and baking soda to this, mix well. Leave it aside for 5 minutes. You can see bubbles appearing. Add vanilla essence and oil to this and mix thoroughly.

Now slowly add the flour in portions at a time to the above mixture. Whisk well until creamy and thick. Finally add the tutti fruity and mix well. The cake mix is ready now.

Preheat the oven to 400F. Grease a cake pan with oil. Pour the cake mix to this. Bake at 400F for 10 minutes and then lower the temperature to 350F, then bake for about 25-30 minutes or until a knife inserted at the centre of the cake comes out clean. Brush the milk on the top for nice polishing glaze about 10 minutes before the end time.


Allow the cake to cool for 10 minutes. Then cut into slices and enjoy this fabulous cake.


Friday, October 7, 2011

Vegetable Fried Rice

Yesterday was my son's Vidyarambham and one of the milestone days in his life. For Vidyarambham we do pooja of Goddess Saraswathy so as to initiate the learning to children. Time sure is  flying and I feel my son is growing so fast ;). Soon he might start going to school and I was imagining his studies, homework and exams. It will be as if I am back to school helping with his homework and other activities...don't know how it would be with this naughty little guy :)

Today's recipe is a simple Vegetable fried rice. This is a great and easy recipe to make use of the leftover rice. If you have the leftover rice, you can make this rice so quick....just add veggies and sauces. I have used carrots and beans, feel free to use any other veggies such as corn, cabbage, peas etc. I served it with some Gobi manchurian, but the gobi was baked rather than deep fried. Check out the recipe here.


What you need?

1 cup Basmati Rice
1/2 cup Onion chopped
1 cup Vegetables chopped (Carrots, Beans)
1/2" pc Ginger finely chopped
2-3 Garlic pods chopped
3/4 tbsp Soya sauce
1 tbsp Tomato sauce
few Spring onions chopped for garnishing
Pepper
Salt
Oil

How to prepare?


If you are not using leftover rice, then cook rice as follows...Wash the rice and soak in some water for about 30 minutes. Put the rice in pressure cooker with few drops of oil and a little salt. Add 1.5 cup water to the cooker and cook for 2 whistles. When the pressure is released, transfer the rice to a plate and spread it, so that rice won't be sticky and let it cool completely.

Heat oil in a pan. Add ginger and garlic and saute until raw smell goes. Now add onions and stir fry for a couple of minutes. Add the vegetables and stir fry for few minutes. The vegetables should not be overcooked and they should retain the crunch.

Now add soya sauce and tomato sauce, mix well. Sprinkle a little salt and pepper, but be careful as a little salt is added while cooking rice and soya sauce also contains salt. Finally add the rice and combine everything well. garnish with spring onions and serve hot.


Have a great weekend friends...Cya soon with another recipe..:)


Sending this to Love your food -Don't Waste it by Amy


What's For Friday Dinner at Srav's Culinary Concpets


CWS- Rice at Kaarasaram , an event initiated by Priya


Wednesday, October 5, 2011

Paneer Spinach Bonda

This recipe is completely inspired from Vardhini's recipe Potato and Spinach Bonda at Zesty Palette. Vardhini has a great blog, do visit her space if you haven't...you will be amazed by her wonderful recipes, clicks and simple explanations with pictures. I made the bondas almost similar to her recipe with the main difference that I used paneer instead of potato.Even I fried the bondas using the paniyaram pan. I had to use only very less oil and a healthy snack was ready which we could munch guilt free. Thanks a lot Vardhini for sharing such a great recipe. It's sure a low calorie and delicious bonda.


What you need?

1/2 of 14oz pkt Paneer
1.5 cup chopped Spinach
1 tsp Chilli powder
1 tsp Coriander powder
1/2 tsp Chaat masala
1/2 tsp Cumin seeds
a pinch Turmeric powder
Salt

For batter:
1/2 cup Besan
1/4 cup Rice flour
1/2 tsp Chilli powder
Salt


How to prepare?

Grate the paneer. Add spinach, cumin seeds, chaat masala, chilli, coriander , turmeric powders and salt to the paneer. Combine well. Make small balls out of it.

Mix all the ingredients listed under For batter along with some water. The batter shouldn't be too thin as you have to coat the balls with it.

Heat the paniyaram pan. Add 2-3 drops of oil in each hole. Dip each ball in the batter and place in each hole.Let the bottom part get brown and  carefully flip it to other side. Let it cook and get brown on the other side too.

Enjoy this wonderful snack with ketchup or some chutney.


Monday, October 3, 2011

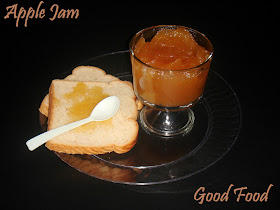
Apple Jam

It's a Monday again...the weekend gets over so soon rt..Wishing all my friends a great week ahead !!

This is the first time I am trying out a jam. There were some leftover apples and I thought a jam would be the best thing to prepare out of them. The Apple jam turned out very good. The home made jam sure tastes great and now I know what I should do with leftover fruits at home. Once the jam was ready, we couldn't wait to taste it with bread. My son wanted only the jam and he was going on asking for more :)

Check out other Apple recipes: Apple Payasam , Apple Cookies, Apple Dates Milkshake .


What you need?

3 Apples
1/2 cup Sugar
1/4 tsp ground Cinnamon 
2 tbsp Lemon juice

How to prepare?

Wash the apples, peel them and chop into small cubes. Add these apples to a pan and about 1/2 cup water, cover and cook until the apples are soft. Once cooked and soft, keep aside and let these cool. Blend the apples with sugar in a blender so as to get a smooth paste.

Now add the apple paste, cinnamon and lemon juice to the pan. Mix well. Cook it stirring constantly until you get a thick mixture. Once cooled, refrigerate it in an airtight container.


Notes:
*Increase sugar if you need more sweetness.
*Add more cinnamon if you like a strong flavour.


Sending this to Love your food -Don't Waste it by Amy